 |
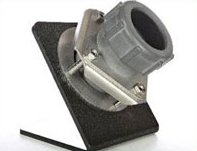
Series 1040 - P V C - Boltless Tank FittingsPLEASE READ THE FOLLOWING INFORMATION PRIOR TO INSTALLING AND USING OUR TANK FITTINGS. FAILURE TO FOLLOW INSTRUCTIONS MAY VOID WARRANTY. |
TFT guarantees its products against defective materials and workmanship only. TFT assumes no responsibility for damages or injuries resulting from improper installation, misapplication, or abuse of any product. Published operating torque requirements are based upon testing of new fittings using clean water at 70 degrees. |
*Because PVC and CPVC plastic products become brittle below 40ºF, TFT recommends caution in their installation and use below this temperature. *Temperature effect on piping systems should always be considered when the systems are initially designed. Piping systems must be designed and supported to prevent excess mechanical loading on TFT PVC products due to system misalignment, weight, shock, vibration, and the effects of thermal expansion and contraction. |
Step(1) Cut hole for the fitting body using a hole saw approximately 1/16"larger than the fitting body. *(Note) Make sure the hole is out of the knuckle radius of the tank. To assure alignment we suggest drilling a pilot hole through the containment tank and the primary tank at the same time. Step(2) Insert the fitting body and gasket through the tank wall. Make sure the surface area and gasket are clean. Step(3) Slide the backing plate and pressure plate over the fitting body. Step(4 ) Insert one half of the retaining ring into desired groove with the solid hole facing up. Insert bolt. ( Anti seize must be applied to all bolts .) Step(5) Rotate the pressure plate 180 degrees and insert other half of the Retaining ring. Then insert bolt. Step (6) Insert remaining bolts and with a TFT #902 tee handle torque wrench tighten studs to 30 inch pounds of torque. (Note) use a rotating pattern to achieve recommended torque. ( P V C fittings must be installed with a TFT #902 torque wrench ) Step (7) Before you begin plumbing to the tank fitting, we suggest that you apply a thread sealant, this will help to seal the threads and also act as a lubricant to help prevent seizing.
|
Series 1030 - Stainless steel - Boltless Tank FittingsPLEASE READ THE FOLLOWING INFORMATION PRIOR TO INSTALLING AND USING OUR TANK FITTINGS. FAILURE TO FOLLOW INSTRUCTIONS MAY VOID WARRANTY.
|
TFT guarantees its products against defective materials and workmanship only. TFT assumes no responsibility for damages or injuries resulting from improper installation, misapplication, or abuse of any product. TFT assumes no responsibility for damages or injuries resulting from chemical incompatibility between its Products and the process fluids to which they are subjected. Published operating torque requirements are based upon testing of new fittings using clean water at 70 degrees.
|
Step(1) Cut hole for the fitting body using a hole saw approximately 1/16" larger than the fitting body. *(Note) Make sure the hole is out of the knuckle radius of the tank. To assure alignment we suggest drilling a pilot hole through the containment tank and the primary tank at the same time. Step(2) Insert the fitting body and gasket through the tank wall. Make sure the surface area and gasket are clean. Step(3) Slide the backing plate and pressure plate over the fitting body. Step(4 ) Insert one half of the retaining ring into desired groove with the solid hole facing up. Insert bolt. ( Anti seize must be applied to all bolts .) Step(5) Rotate the pressure plate 180 degrees and insert other half of the Retaining ring. Then insert bolt. Step (6) Insert remaining bolts and with a torque wrench tighten studs to 80 inch pounds of torque. (Note) use a rotating pattern to achieve recommended torque. (For best results use WCTF #904 preset tee handle torque wrench.) Step (7) Before you begin plumbing to the tank fitting, we suggest that you apply a thread sealant, this will help to seal the threads and also act as a lubricant to help prevent seizing. THE SYSTEM AND TANK SHOULD BE DEPRESSURIZED AND DRAINED BEFORE ATTEMPTING TO INSTALL A TANK FITTING. VENTING AND PROPER PERSONAL PROTECTION EQUIPMENT SHOULD BE USED WHEN ENTERING TANKS.
|
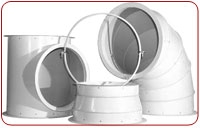
Series 1041 - P V C - Transition fitting installation instructionsPLEASE READ THE FOLLOWING INFORMATION PRIOR TO INSTALLING AND USING OUR TANK FITTINGS. FAILURE TO FOLLOW INSTRUCTIONS MAY VOID WARRANTY. TFT guarantees its products against defective materials and workmanship only. TFT assumes no responsibility for damages or injuries resulting from improper installation, misapplication, or abuse of any product. Published operating torque requirements are based upon testing of new fittings using clean water at 70 degrees.
|
*Because PVC and CPVC plastic products become brittle below 40ºF, TFT recommends caution in their installation and use below this temperature. *Temperature effect on piping systems should always be considered when the systems are initially designed. Piping systems must be designed and supported to prevent excess mechanical loading on TFT PVC products due to system misalignment, weight, shock, vibration, and the effects of thermal expansion and contraction.
|
| Step 1 To assure alignment we suggest drilling a pilot hole through the primary tank and the containment tank. Step 2 Install primary tank fitting (Refer to installation sheet 1030,1036,1040 series) Step 3 Cut hole in the containment tank for the transition fitting, using a 3-1/4" hole saw. step 4 Insert transition fitting body and gasket through the tank wall. Make sure the tank surface and gasket are clean. step 5 Slide the backing plate and the pressure plate over the fitting body, ( Note ) When installing the backing plate, make sure it is centered over the fitting body to assure even pressure on the gasket. Step 6 Insert one half of the retaining ring into groove with solid hole facing up. Then insert bolt. ( Anti-seize must be applied to all bolts ) Step 7 Rotate the pressure plate180 degrees and then insert the other half of the retaining ring, then insert bolt. Step 8 Insert remaining bolts and with a TFT # 902 preset torque wrench, tighten bolts to 30 inch pounds. ( Note ) Use a rotating pattern to achieve recommended torque. ( PVC and poly fittings must be installed with a TFT # 902 torque wrench ) Steps 9-10 can be completed at the job site, eliminating extra handling costs and possible damage to the fittings and tanks. Step 9 Once the primary tank fitting and transition fitting have been installed, Install 2" conn- ectionpipe by sliding the pipe through the transition and screwing it into the primary tank fitting. ( Note ) apply a thread sealant, this will help to seal the threads and also act as a lubricant to help prevent seizing. Step 10 Slide the grommet seal over the connection pipe and into the transition fitting. Then seal the system by tightening the compression nut hand tight Plus 1/4 turn with a wrench. |